Jagdtiger X7


Introduction
Like many armor modelers, I like big cats (especially of the German WWII variety). In my opinion: “The bigger the better!”
So after seeing Martin Kovac’s (Uncle Nightshift’s) now YouTube famous Jagdtiger 331, I knew this was something I needed to build.
And as luck would have it; I found just the Jagdtiger kit at the 2024 Silicon Valley IPMS show back in June. It was a helluva deal too; couldn’t say no, because it came bundled with Voyager photo etch included! Mmmmmm yesssss).
But what approach should I take with this subject matter? How could my attempt at a Jagdtiger be… unique? What could I offer to the Jagdtiger “conversation” so to speak?
I also didn’t want to just slavishly copy Martin’s excellent work… after all… that would be… sacrilege? Desecration? No matter… I began doing my own research.
Inspiration
The best inspiration comes from limitations. In my case, the limitation was the 1:35 Dragon kit (no. 6285) that I bought. It was originally released back in 2005 and for the time - an undeniably good kit. Plus, it came with some cool box art, some metal and photo etch parts and a metal gun barrel. Good bones.
The box art also depicts coniferous tree branches for camouflage and some damage with missing side skirts (shurtzen?). Cool stuff.
These features make a subject matter unique; they give it character. They also offer unique opportunities to do something different.
I contemplated using different aftermarket decals and going with several prototypes.
But in the end, I went with the kit-supplied decals for Jagdtiger X7 after scouring the internet looking for photographic resources… and there are many!
Photographic Resources
You can do a search for yourself on Google like I did and find a bunch of photos of X7; however, you can find the best resource photos and details (for this particular Jagdtger) in Steven A. Zaloga’s, Panzer in the Gunsights 2 from his Armor at War Series.


The second best resource for understanding X7’s history and backstory is Jagdtiger Vol. 2 - Operational History by Andrew Devey. His second volume details the use of the Jagdtiger tank destroyer in World War II. The first volume covers Technical History and focuses on the design and construction of the tank
I found an old forum thread on Tapatalk where user James Blackwell summarizes and adds his own comments on X7’s backstory, heavily referencing Devey from his book:
“But in short, here's a summary of what we know (mostly from Devey's "Jagdtiger Vol.2 - Operational History" and the US Tech Report);
It was chassis no.305058 and belonged to 2.Plt. of 1.Kp. of s.Pz.Abt.512 under Oblt. Albert Ernst ("X7" was commanded by Lt. Sepp Tarlach at the time - later seen surrendering with Ernst and Rondorf in Iserlohn on April 16).
It was actually hit by friendly not enemy fire on 1 April 1945 and was their fifth vehicle lost out of the 10 they had, in the space of 4 days from March 28th in the retreat back to Siegen (1 had its drive spkt. shot off, and the other 3 were lost to mechanical failures prior to being destroyed by the crews).
"X7" was in the midst of a firefight on the corner of Bahnhofstrasse and Oranienstrasse in a small town called Netphen/Obernetphen - vs. Devey's possibly anglicised version of the location which calls it out as Obernephen (sic)?
Apparently in the smoke and confusion 2 Panzerfausts, presumably fired by supporting infantry who mistook it for an enemy tank, struck its left hand side - one hit on the LHS front upper superstructure near the front plate interlocks, while the other penetrated the side plate under the engine deck and immobilised it causing the crew to abandon it though without time to destroy it. The assumption being it was fired by the Germans either accidentally or to further disable it before they left.
But as a minor point of interest and possibly related in a thread on AFVN in Sept. last year, a report was raised mentioning a US Silver Star recipient Pfc. Cox of the 740th Tank Battalion/8.Inf.Div. who had KO'd an 80 ton German tank at Nepthen. See; http://www.techwarrior.cx/~roliver/8th/8th-history.pdf (see p.85 where Nepthen gets a mention as being cleared by midnight of April 1). Perhaps this was his handiwork with a couple of captured Panzerfausts after all and not a friendly fire hit?? It may never be able to be determined, but is an interesting similarity nevertheless that this town is raised and its the only known loss there, so something to ponder or inspire deeper digging...
Anyway regardless It was then captured largely intact shortly there after and was the first JT to be examined by the US Tech Intell teams being the subject of report No.275 on 10 May 1945 with 9 photos taken inside and out.
It was initially a mid-February release production vehicle but was one of 11 subsequently recalled soon after for rebuild due to defective steering units. It therefore has the following features;
- 3 rows of spare track hangers on the hull sides which began in December 44
- No Pilsen mounts on the roof
- No jack or jack block carried on the rear plate (dropped in Nov/Dec 44)
- No bolted cover plate over the engine comp. ventilator mesh on the deck
- Engine hatch latch hook added to centre of hatch
- 2 hatch handles on the front hatches
- Single grab handle above the rear access doors - being the first to be fitted with it
- Rear MG Pedestal moved off engine hatch itself to just behind it on the engine deck
- Late travel lock with stopper/light conduit channel on glacis (introd after 305032)
- No lip on mantlet collar
- Vertical projectile stowage internally (vs. horizontal seen in others) but normal horizontal case stowage
There is some debate as to whether its camouflaged, with some arguing its plain dark yellow only, but my personal feeling is that it is actually camo'd with green and yellow over a primer base but just covered in a very heavy layer of dust and being photographed in bright sunlight it appears monotone from some angles.One of the German readers (Oliver perhaps?) has previously posted 'then and now' shots of the location (outside the Schröder family house, which it seems wasn't in fact demolished in 1973 to make way for a supermarket as Devey strangely claims?).”Jagdtiger X7: Key features and unique takeawaysBased on these resources and photographic images, the following are the most significant visual differences unique to X7.
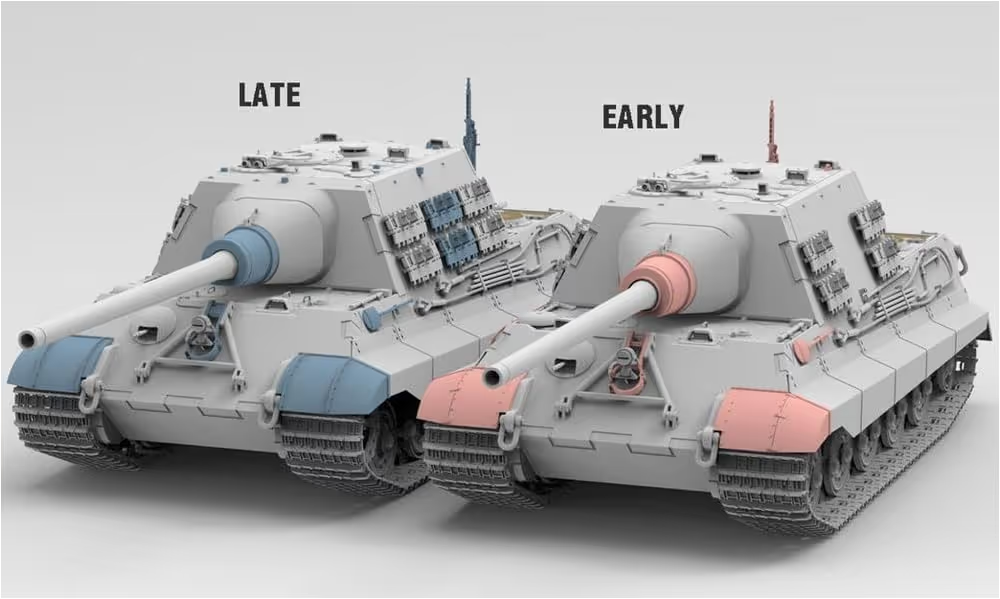
- Early/Late Hybrid: X7 is an early/late Jagdtiger hybrid - it has some distinctive features of both production variants per Devey’s account, like early version front fenders vs. late version.
- Spare Tracks: X7 clearly has three columns of late version spare tracks vs. just two on the early version.
- No Rear Jack Mount: like most later Jagdtigers, X7 is missing the mounts for a jack; however, photos do show a jack present atop the rear deck.
- Hatch Handles: later Jagdtigers had two hatch handles mounted on top of the front top hatches.
- Rear Access Door Grab Handle: pictures clearly show a rear grab handle mounted above the rear access doors.
- Late Version Gun Mantlet: This isn’t always 100% clear in reference photos, but it's there when you know what you’re looking at. X7 clearly rocks a late version gun mantlet despite having many early version features.
- Tow cables: The secondary tow cable system (mounted on the side hull for early versions) is clearly mounted on the rear deck, wrapped around the rear circular vent.
Bonus odd features:
- Repositioned MG42 Mount: You can see that the mount for the anti-aircraft MG42 is in a “weird” spot. Cool! That’s unique.
- Fire Extinguisher: Photos clearly show the fire extinguisher on the rear deck is mounted in reverse.
- Damaged/Missing Things: Photos clearly show missing mounts for one set of spare tracks, missing black and white cross on the side of the hull, and wonky front fenders and side skirts with some damage.
- Fire: So the story goes, X7 suffered fire damage (most likely from friendly fire). Not all photos make this clear, but you can see it best in a colorized image of the rear.
But what’s the best way to visually understand the differences between an early vs. late Jagdtiger?The answer is the Takom Blitz kit! These promotional photos from Takom’s Jagdtiger Blitz kit (released in 2019) do a fantastic job highlighting what’s different.

The BuildI originally thought the Dragon kit would come with everything I needed to build a proper example of Jagdtiger X7. Dragon kits are great after all… what could go wrong?Several things… Dive into the kit and you’ll find that all of the features Dragon chose to model for this kit are early model example features. Specifically, check out the gun mantlet and rear engine deck… early versions… What to do? Well… just buy the late version sprues from the Takom kit of course. So… that now meant I was building a hybrid… a Drakom Jagdtiger if you will… HOT TAKE: don’t build old kits… even if you get it for a great price… 99% of the time, just buy new. You’re most often going to get a better researched kit with better tooling and it will be worth it in the long run.If I were to do this project over again, I’d get the Takom kit and call it a day.BUT! This is what I had (great price, remember?) and I was committed to making it work. At least there’s a story to tell now and I could dial up the uniqueness factor even more.Jagdtiger X7 parts listMain kit:
- Dragon Jagdtiger Kit # 6285

Supplementary kit:

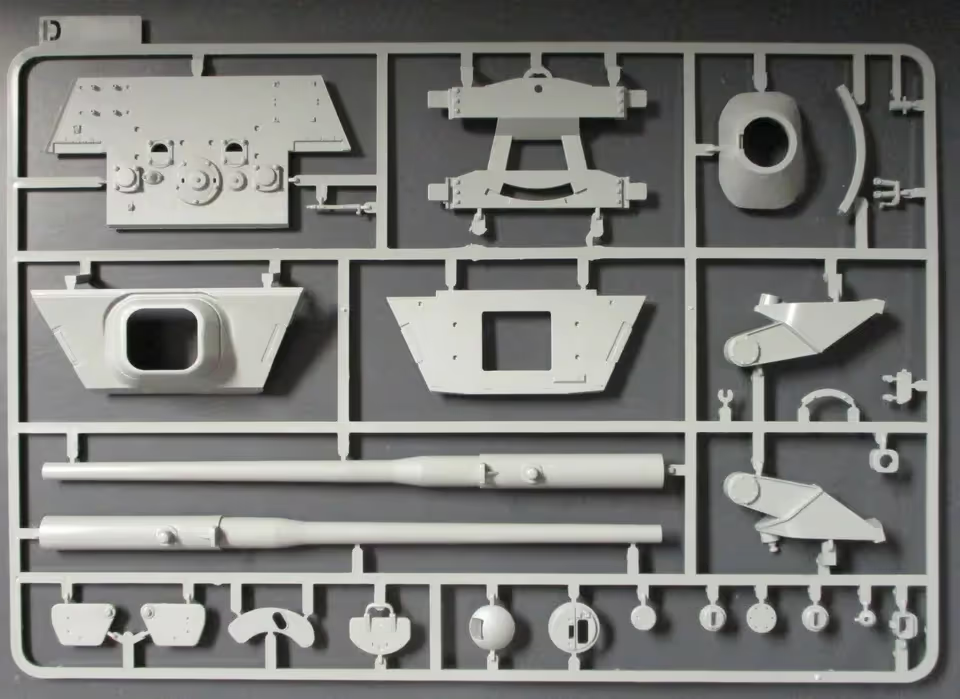
Specifically I acquired/used these sprues:
- Takom 1/35 Scale Jagdtiger Early/Late - Parts Tree D from Kit No. 8001
- Takom 1/35 Scale Jagdtiger Early/Late - Parts Tree E from Kit No. 8001

Parts: Voyager Models Jagdtiger Photo Etch # PE 35053 - (This is an older Voyager kit - there are plenty of updated versions specific to various kits you can find on Ebay)Voyager Models King Tiger Schurzen for Takom kit # PEA396 - (This kit had leftover from my King Build that worked perfectly for the two pieces of side skirt needed for X7.)

Friulmodel Metal Tracks - FRUATL042 1:35 Friulmodel Track Link Set - Tiger II Hunting Tiger Transport Type (210 Links)

Master Models MG42 - MASGM35024 1:35 Master Model German Machine Gun MG-42 (7.92mm) Set

Jagdtiger X7 construction
Sadly, I didn’t take any photos of the construction process, only the finished product before it got a coat of grey Mr. Surfacer primer.
However, here’s the short of the long:
Hull and major construction
This was straightforward and simple. The Dragon kit goes together nicely without a fight. There aren’t many gaps to fill or wonkiness with fitting.
Gun mantlet
This was the only place where I really needed to do some construction. The metal barrel supplied in the dragon kit didn’t fit, so that needed some work. The mantlet didn’t fit either and needed some trimming and kit bashing.
The takeaway: you can 100% mount the Takom late version mantlet and use it with the Dragon kit without a lot of pain.
Cast metal and rolled steel textures
Of course I wanted to emulate Martin Kovac’s Jagdtiger. I made sure to apply Tamiya putty for cast steel textures and use Tamiya extra thin cement to simulate rolled steel per his techniques.
Weld beads
Same idea (a la Uncle Nightshift)… green putty rolled into small spaghetti noodles and then preseed into place with specialty made “weld tools.”
Photoetch and details
Ahhhhh grieblies… fun and lovely and maddening at the same time. If you know; you know… especially if you’ve ever worked with Voyager photoetch. Tool clamps are the worst bit… they’re extremely difficult to put together. Everything else went together nicely without problems.
Tracks
Friulmodel tracks are alway fun (at least for me). No problems here: dump out the components, put ‘em together, stick a wire through the center, snip snip and call it day. It takes some time, but the results in the end are rewarding.
Sources:
Scale Mates - Dragon Jagdtiger Kit
Steven Zaloga, Panzers in the Gunsights: German Artillery Photos (Concord Publications, 1996).
